C Read the video script about how to make a cake. Circle the mistakes and correct them in the blanks below.
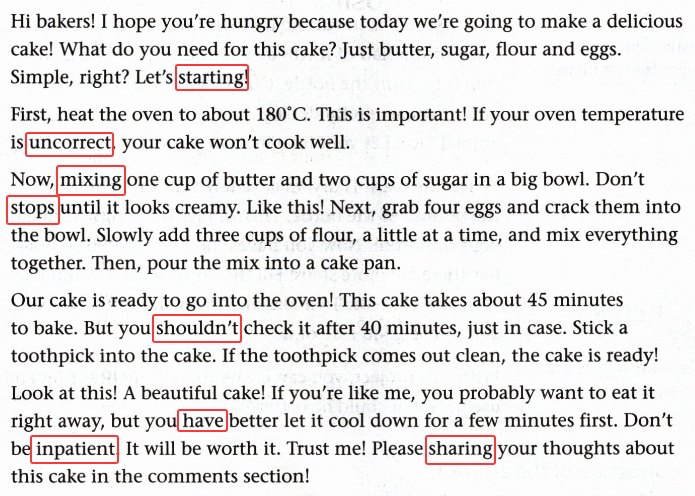
Hi bakers! I hope you're hungry because today we're going to make a delicious cake! What do you need for this cake? Just butter, sugar, flour and eggs. Simple, right? Let's starting!
First, heat the oven to about 180°C. This is important! If your oven temperature is uncorrect, your cake won't cook well.
Now, mixing one cup of butter and two cups of sugar in a big bowl. Don't stops until it looks creamy. Like this! Next, grab four eggs and crack them into the bowl. Slowly add three cups of flour, a little at a time, and mix everything together. Then, pour the mix into a cake pan.
Our cake is ready to go into the oven! This cake takes about 45 minutes to bake. But you shouldn't check it after 40 minutes, just in case. Stick a toothpick into the cake. If the toothpick comes out clean, the cake is ready! Look at this! A beautiful cake! If you're like me, you probably want to eat it right away, but you have better let it cool down for a few minutes first. Don't be inpatient. It will be worth it. Trust me! Please sharing your thoughts about this cake in the comments section!
(1) ______ (2) ______ (3) ______ (4) ______
(5) ______ (6) ______ (7) ______ (8) ______
答案:
【解析】:
这是一道英语语法纠错题,考查学生对英语语法、词汇及固定搭配的掌握情况。解题的关键在于仔细阅读文本,找出其中存在的语法错误、用词不当等问题,并进行正确修改。
1. “Let's starting!”中“starting”使用错误,“let's”后接动词原形,应改为“start”。
2. “If your oven temperature is uncorrect”中“uncorrect”拼写错误,正确的是“incorrect”。
3. “mixing one cup of butter and two cups of sugar in a big bowl”中“mixing”使用错误,这里是祈使句,要用动词原形“mix”。
4. “Don't stops until it looks creamy”中“stops”使用错误,“don't”后接动词原形,应改为“stop”。
5. “you shouldn't check it after 40 minutes”表述有误,根据语境应该是“你应该在40分钟后检查”,应改为“you should check it after 40 minutes”。
6. “you have better let it cool down for a few minutes first”中“have better”使用错误,正确的是“had better”。
7. “Don't be inpatient”中“inpatient”拼写错误,正确的是“impatient”。
8. “Please sharing your thoughts about this cake in the comments section!”中“sharing”使用错误,“please”后接动词原形,应改为“share”。
【答案】:
(1) starting→start
(2) uncorrect→incorrect
(3) mixing→mix
(4) stops→stop
(5) shouldn't→should
(6) have →had
(7) inpatient→impatient
(8) sharing→share
My DIY lab
A Amy is writing about how to make flowerpots. Read her article and learn how to write about a DIY project.


◆ Structure of the article ◆
Beginning: Clearly introduce the DIY project.
Main body
$\begin{cases}Talk about the things you need for the DIY project. \\ Explain how to do the DIY project step by step.\end{cases}$
Ending: Summarize why you enjoy the DIY project.
My Homemade Pencil Case
I enjoy doing DIY projects in my free time. Making a pencil case with old jeans is one of my favorite projects—it’s easy and creative!
What do you need for this project? An old pair of jeans, a pair of scissors, a needle, some thread, and a few buttons.
The first step is to cut a rectangle from the leg of the jeans. The size can be about 20 cm long and 15 cm wide. Next, fold the rectangle in half and sew the two long sides together with the needle and thread. You’d better sew carefully to make sure it’s strong. Then, turn it inside out so the stitches are not visible. After that, sew on the buttons as decorations. You can also add a small pocket on the front if you like. Now your pencil case is ready!
This DIY project is wonderful because it turns old jeans into something useful. It also lets me show my creativity. I feel proud every time I use my unique pencil case!
答案:
My Homemade Pencil Case
I enjoy doing DIY projects in my free time. Making a pencil case with old jeans is one of my favorite projects—it’s easy and creative!
What do you need for this project? An old pair of jeans, a pair of scissors, a needle, some thread, and a few buttons.
The first step is to cut a rectangle from the leg of the jeans. The size can be about 20 cm long and 15 cm wide. Next, fold the rectangle in half and sew the two long sides together with the needle and thread. You’d better sew carefully to make sure it’s strong. Then, turn it inside out so the stitches are not visible. After that, sew on the buttons as decorations. You can also add a small pocket on the front if you like. Now your pencil case is ready!
This DIY project is wonderful because it turns old jeans into something useful. It also lets me show my creativity. I feel proud every time I use my unique pencil case!
(我自制的铅笔盒
我在空闲时间喜欢做手工项目。用旧牛仔裤制作铅笔盒是我最喜欢的一个项目——既简单又富有创意!
做这个项目需要什么材料呢?一条旧牛仔裤、一把剪刀、一根针、一些线和几个纽扣。
第一步是从牛仔裤的腿部剪下一个长方形。尺寸大约为 20 厘米长、15 厘米宽。接下来,将这个长方形对折,用针和线将两条长边缝在一起。一定要仔细缝制,以确保结实。然后,将它翻过来,使缝线不显眼。之后,缝上纽扣作为装饰。如果你喜欢的话,还可以在前面加一个小口袋。现在你的铅笔盒就做好了!
这个手工项目很棒,因为它把旧牛仔裤变成了有用的东西。它也让我能够展示自己的创造力。每次我使用我独一无二的铅笔盒时,我都会感到很自豪!)查看更多完整答案,请扫码查看

